How To
Running Classic Software on an Intel Mac
I have now been using Macs for almost 18 years. My first hands-on experience with the Mac was in high school, during my junior year, which began in 1986. The school had purchased 25 Mac SEs and five ImageWriter printers and had them networked with LocalTalk. I spent hours in the computer lab, tinkering with them and learning how they ticked.
I’ve used every operating system Apple has released for the Mac since that time, and, in the process, collected hundreds of programs, including many games, for these older systems. Most of these are shareware games, but they include a few classic commercial releases such as Prince of Persia and the Carmen Sandiego series.
Now I have kids, aged four and six. In addition to my own MacBook Pro and my wife’s PowerBook G4, we bought a clamshell iBook for the kids to play games on and run some of the educational software we have. My son, the six-year-old, loves to play video games, finding some that he enjoys on the Web as well as a few CD-ROM games.
I’ve been meaning to get some of these up and running on the iBook for quite a while, but hadn’t gotten to it until recently. As I was doing so, I remembered how much joy I had experienced playing these games, and lamented the fact that I couldn’t play them on my MacBook Pro. Classic isn’t available for the Intel-based Macs. This actually became a real minor problem recently, as a client had some FileMaker 4 files that I needed to look at before converting them, and FileMaker 4 only runs in Classic.
But I’ve always been interested in hardware emulation, if for no other reason than I needed first Virtual PC and now Parallels in order to test software I’ve written with FileMaker and REALbasic on the Windows platform. I remembered a few programs out there that emulate old Mac processors, and decided to check them out.
What Is Emulation?
Every computer has a central processor. This is the brain of the computer, where all of the computation takes place. In order for a program to work, it sends instructions to this processor. The art of programming is the art of writing out instructions for the processor to perform. Actually, very few people actually write real instructions for the processor. Instead, what they do is write the instructions in a language that can be translated to something the processor understands. This is what it means to compile a program. When a programmer writes software, usually a computer language such as C is used. A compiler then translates the instructions written in C into instructions that the processor can actually understand.
In order for a compiler to do this correctly, it has to know what instructions the processor understands. Every processor understands a different set of instructions. This is why when you compile a program for the older PowerPC Macintosh computers; it won’t run, for instance, on Intel-based Windows machines. The instructions are meant for the PowerPC processors, and the Intel processors don’t understand those instructions.
The easiest way to think of an emulator is as a real-time translator of processor instructions. Take, for example, Virtual PC. This program allows Intel-based Windows software to run on PowerPC Macintosh computers. It does this by emulating the Intel processor, so that whenever an instruction for the Intel processor is received by the program, it translates that instruction into one or more equivalent PowerPC instructions.
Why Use Emulation?
Over the life of the Macintosh line of computers, three different families of processors have been used. First there was the 68K family from Motorola, which was used during the first 10 years of the Mac. Then, in 1994, Apple switched to the PowerPC family, designed jointly by Apple, Motorola, and IBM. Finally, most recently, Apple has again changed processors, this time to the Intel x86 line. If this trend continues, we should see another processor switch some time around 2015 or so.
Modern Intel-based Macs come with an emulation technology called Rosetta, which enables the new computers to run Mac OS X–based PowerPC software. However, Rosetta doesn’t enable the use of Classic software, just as Mac OS X on PowerPC didn’t allow the use of Intel-based software. In order to use an Intel Mac to run programs written for System 7 or a Mac Plus, you have to provide the computer with your own emulation.
Fortunately, the open source community has filled the void left by Apple. There are at least three open source projects out there that will allow you to run Classic software on an Intel Mac (as well as other solutions for running Apple ][ or even Atari software). Getting it working isn’t always easy, but I’ve spent the last few days working on it for myself, so I’ll share my experiences here.
Emulation Options
There are three primary programs I found for running old Mac software: SheepShaver, Basilisk II, and Mini vMac. I’m actually using all three for different reasons, so I’ll take you through the process of setting each of these up.
Although each of these programs allows the execution of older Mac programs, they each do so in different ways, but fortunately, all three have versions that work on Intel Macs.
There is, however, a caveat regarding each of these programs. The Mac OS doesn’t rely only on the processor to run. It also needs to have access to a piece of hardware called the ROM, which contains machine-specific instructions for each model of Macintosh. Fortunately, the information on these ROM chips can be stored as a file that the emulators can access. Unfortunately, finding these ROM files online is often difficult, as they are protected by copyright law. Fortunately, if you have an old Mac, there are programs which allow you to copy the ROM to a file that can be used by the emulators. Also, fortunately, I was able to find the ROM files I needed online or on CDs that I never threw away. But it was an interesting process, especially in the case of SheepShaver.
SheepShaver was the first program I checked out. This program emulates the PowerPC processor and versions of it are available for Windows, and Linux, as well as PowerPC and Intel Macs. Running SheepShaver to emulate a PowerPC on a PowerPC may make sense if you want to run an OS other than Mac OS 9 (it works with anything between 7.5.2 and 9.0.1).
I also installed Basilisk II, which emulates a 68K processor. This means it will run System 0.x through 8.1.
Finally, Mini vMac emulates a few of the early Macs, including the Mac 128K, 512K, 512Ke and SE, each of which should run System 0.x through 7.5.3.
Why have two emulators of the 68K Macs? Because Basilisk II will emulate either a classic Mac (the first compact Macs with 9-inch black-and-white built-in monitors) or what it calls the Mac II series (which includes Macs with the 68030 and 68040 processors, even though no Mac II ever had a 68040). The latter emulation will run System 7.6, which I wanted to do. But I also wanted to run System 6.0.8 (the last Mac OS before System 7), and it’s easier for me to have a separate program for each OS version.
To give you an idea of where our final destination will be, take a look at this screenshot, which shows all three of these programs running on my MacBook Pro, giving a single view of System 6.0.8, System 7.6, Mac OS 8.6, and Mac OS X 10.4.7 (with Windows XP running in Parallels thrown in for good measure).

Please note that this is more of a journal than a tutorial. This is what worked for me, and you may have to perform quite different steps to get things working for yourself. However, there are some good places to get help if you need it, and I’ll point these out as we go along.
SheepShaver
Although it took me a few days to get it up and running, in hindsight, SheepShaver was the easiest of the three to install and configure. This is due to the fact that, while it requires a ROM file like the others, this ROM file can be obtained from Apple installation CDs or update disk images available from their Web site.
Installing SheepShaver itself is a snap, simply download it from the Web site, unpack the archive, and drag it to where you want it. Two applications are included with the download: SheepShaver itself and an application for editing the settings file.
First, let me tell about the road to avoid. According to the SheepShaver Web site, the software can work with a number of ROM files available from Apple through installation CDs and updates. One listed as working is the ROM image on the installation CD for 8.5. Since I have the 8.5 installation CD, I tried this. After some helpful troubleshooting from a couple of people on the SheepShaver forums, it turns out that this particular ROM file won’t work on a MacBook Pro, and perhaps not on Intel Macs at all (although it may still work when running SheepShaver on other platforms).
The path I did take was to get the Mac OS ROM Update 1.0 from Apple’s Web site. Unfortunately, the ROM file is embedded within the installation package, which can’t be read on an Intel Mac. However, there is a classic program called TomeViewer (before Mac OS X installation packages, software was often placed in archives called tomes).
The downside here is a catch-22: You need to be able to run classic software in order to use TomeViewer, which you want to use so you can run classic software. In other words, you’re going to need another method in order to extract the ROM file. I have an old PowerBook 1400. This I connected to my Ethernet network by sharing the connection on my MacBook Pro. I copied the ROM Update and the TomeViewer software to the 1400, extracted the ROM file using TomeViewer, and copied the ROM file back to the MacBook Pro. Files were shared between the two by using Mac OS X’s built-in FTP server on the MacBook Pro and Fetch 4 on the 1400, which I also found an old copy of. For some reason, I couldn’t get AppleTalk file sharing to work between the two portables.
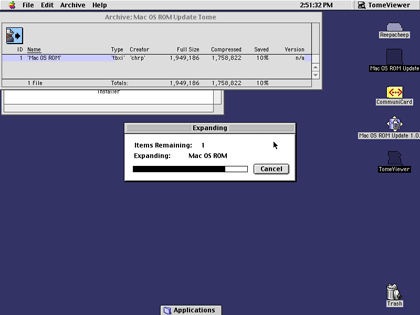
However you do it, you’re going to need to run TomeViewer under the classic OS and get the update package to the machine it’s running under. The update package is delivered in a self-mounting image, which when double-clicked will mount a disk image on the desktop. Once it’s mounted, launch TomeViewer and use it to open the Mac OS ROM Update Tome file on the disk image. The only file in the tome archive is Mac OS ROM, so click it and choose Archive ‣ Expand from the menu bar. Get the expanded file to your Intel Mac for use by SheepShaver.
There’s one more file that you need to download before actually using SheepShaver: a keycodes file. Apparently this is used so that modern keyboards can be used with the older operating systems. The easiest way to get the keycodes file is with the Basilisk II download. In the archive is a file called BasiliskII_keycodes. You can store this file anywhere you like, although the most useful place would probably be in the same folder you have SheepShaver in.
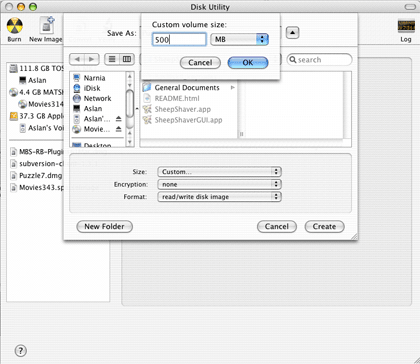
Now that you have all the files necessary from the Internet, you need to create one for yourself. This is the disk image that will be used as the startup drive for SheepShaver. For this you can use Disk Utility. Make sure the disk image you create has enough room for the OS and any applications you want to include. I made mine 500 MB in size, which seems more than sufficient. After installing Mac OS 8.6 on the image, I still had over 300 MB available, which leaves enough room for the few applications I wanted to have. Make sure the disk image is not encrypted and that the format allows reads and writes. You can’t use a sparse image for this. Again, a handy place to keep this file is in the same folder as SheepShaver. If the disk image gets mounted after being created, be sure to unmount it before launching SheepShaver. You don’t want to have two operating systems attempting to access the drive image at the same time.
Everything is now ready to begin configuring SheepShaver. Launch the SheepShaverGUI application. Most of the settings you see in it can be left as their defaults, but you will want to point the software to the ROM file, the keycodes file, and the disk image file. The GUI application was written in Java, so the interface is far from the OS X Aqua look and feel, but at least you can edit SheepShaver’s settings without using a text editor.
In the Volumes tab, click the Add button and navigate to the folder your disk image is in, select it, and click OK. You’ll also want to change the Unix Root. This is the path to a folder on your computer that SheepShaver will grant access to within the emulated OS. It is not recommended that this path be to the root level of your hard drive nor to your home folder. I anticipate using a single folder for transferring files to all of the emulated OSes, so I created folder called EmulatorTransfer in my home directory and set this as the Unix Root.
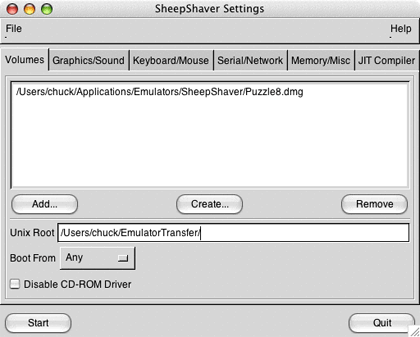
I should note, however, that I was never successful in transferring files with the shared folder. Instead, I ended up mounting Puzzle8 while the emulator was shut down, copying files to the disk image, unmounting it, and then launching SheepShaver. This was a simple enough workaround for me to not even troubleshoot why the shared folder didn’t work.
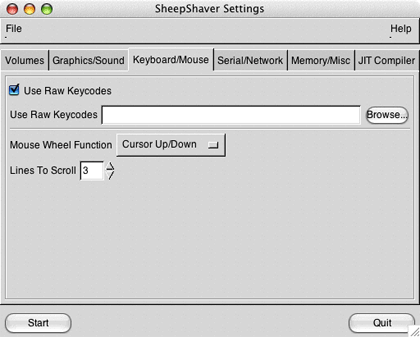
Click the Keyboard/Mouse tab and select Use Raw Keycodes, and then click the Browse button to select the BasiliskII_keycodes file.
Go to the Memory/Misc tab and click Browse to select your ROM file. You can also use this tab to set the memory available to the emulated OS. I set mine to 64 MB.
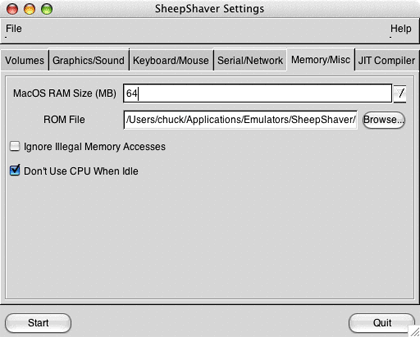
If you want the emulated OS to have network access, select “slirp” for Ethernet Interface in the Serial/Network tab. Finally, you can set the refresh rate and resolution of the window in the Graphics/Sound tab. I found that 15 Hz for the refresh rate and 1024×768 worked well on my MacBook Pro. Oddly, the resolution width and height are set separately, but another common resolution is 800×600.
You now need to install a classic Mac OS onto the disk image. I used a Mac OS 8 install CD. Although on some platforms SheepShaver can run any OS from 7.5.2 through 9.0.4, under Mac OS X, the earliest supported OS is 8.5. Note that if you have a 9.1 installation CD included with some computers that run OS X will not work. Hopefully someday the more modern OSes will be supported, perhaps even OS X versions, which may prove handy for software testing.
To launch SheepShaver, you can either click Start within SheepShaverGUI or quit the GUI application and double-click SheepShaver itself. Since the disk image assigned is blank, SheepShaver automatically starts up off of the CD. Double-clicking the Mac OS Install program on the CD begins the installation process.
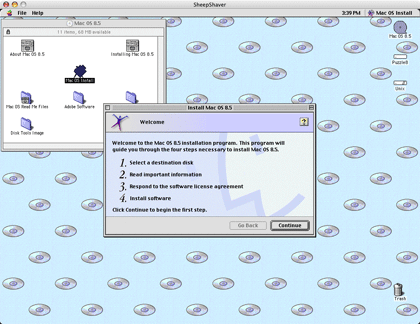
During installation you are given the opportunity to customize the process. Before clicking the Start button to begin the installation, click Customize. I deselected everything except for Mac OS 8.5, Internet Access, and Mac OS Runtime for Java. For each of these, I kept the recommended installation.
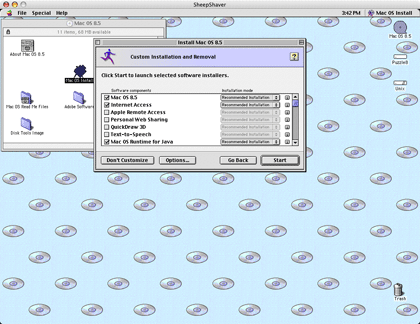
(For those of you wondering why the drive image is named Puzzle, it’s a Narnia reference: my main hard drive is Aslan, and Puzzle the donkey in The Last Battle, pretending to be Aslan. It’s Puzzle8 because this particular image will have Mac OS 8 on it.)
Once the installation has finished, restart the emulation and SheepShaver will boot with the installed OS. There are two things I did right away. Included in the 8.5 installation is Internet Explorer 4, which doesn’t seem to work at all with most modern Web sites. I used the 9.1 CD I had to get Internet Explorer 5 onto the virtual machine so that I could browse Web sites with it. It isn’t something I would commonly do, but it would often be easier to get some of the public domain software available onto the system.
Once IE 5 was installed, I used it to visit Apple’s Web site and get the 8.6 update and installed it. From there I was able to install some of my favorite old games.
Basilisk II
Whereas SheepShaver emulates the PowerPC processor, Basilisk II emulates the 68K processor. Because Basilisk II is open source (as is SheepShaver), there are a number of binary builds for Mac OS X. I used the version hosted in the same place I got SheepShaver from, which is officially known as Basilisk II JIT. The “JIT” is short for “just in time,” and it attempts to increase the performance of Basilisk II by using dynamic recompilation techniques to translate the 68K machine code into that understood by Intel processors. If that doesn’t make much sense to you, don’t worry, as you don’t need to understand it to use the software.
Just like SheepShaver, Basilisk II needs, in addition to the binary executable, a ROM image, a disk image to boot from, and a source from which to install the operating system.
In Basilisk II, the ROM image must be an image from an actual computer. Again, these are difficult to find online because of copyright issues. If you have an old 68K Mac, you can use CopyROM to extract the ROM information to a file that you can then transfer to the emulating computer. I don’t know if it will be available long, but I did find a Quadra 650 ROM image available for download from one site. A careful Google search may turn up other locations.
Once you have the application and the ROM image, you can create a disk image just like with SheepShaver by using Disk Utility. Again, for me a 500 MB image seemed sufficient. After you have all of these files, you launch the GUI application, which is very similar to SheepShaver’s. Set the disk image, Unix root, ROM image, and keycodes file, as well as any other settings, such as the RAM and the Ethernet interface. I used a 7.6 installation CD in this case, so I inserted it into the drive slot and launched Basilisk II by clicking Start in the GUI application. If you don’t have an installation CD for System 7 through 8.1, you can access System 7.5.3 from Apple for free.
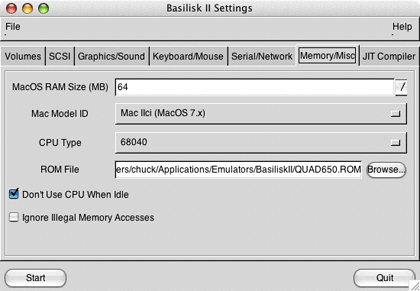
Since the disk image was new and therefore blank, Basilisk II booted from the CD-ROM. Unlike SheepShaver, although Basilisk II did see the disk image, it needed to format it, probably because it was formatted as HFS+ rather than System 7’s older HFS format. After this was done, it was simply a matter of running the installer. As with SheepShaver, I disabled most of the options for the installation, keeping only Mac OS 7.6, MacLinkPlus 8.1, and Open Transport PPP 1.0. That last one may not have been necessary, but I wanted to make sure that Open Transport was installed, and not remembering if it was by default, I do know that the PPP control panel (which I later disabled with Extensions Manager) requires the TCP/IP control panel rather than the older MacTCP control panel.
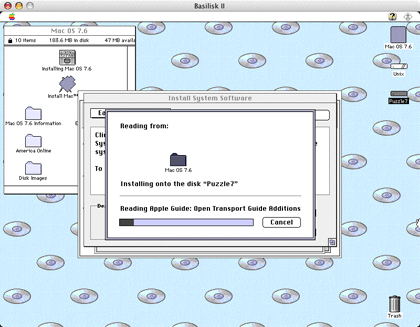
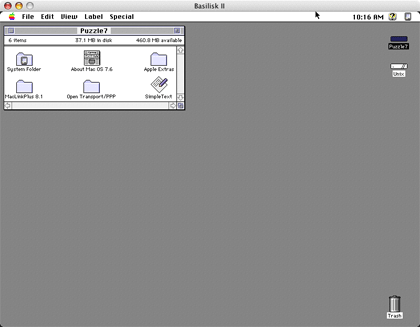
The installation took only a few minutes, and once it was finished, a restart booted off of the OS on the disk image.
Mini vMac
Since we’re moving backwards in Mac OS history, beginning with Mac OS 8.6, then installing 7.6, our final emulator will let us work with System 6.0.8. The first version of System 6 was released in 1988, so we’ll be going back in time 18 years in running it on the latest Mac hardware. We could actually go back to System 1 from 1984, but System 6 is probably the best combination of running software built for the Mac Plus/SE lines while retaining stability and features as much as possible.
Just like the other emulators covered, we need the executable, a ROM image, a disk image, and the installation software. Mini vMac has been compiled to emulate either the Mac 128K, Mac Plus or the Mac SE, and I used the SE version.
You can use CopyROM to extract the ROM image from your own SE if you have one (although unless it has an Ethernet card, I don’t even want to think about how to get such a file to your Intel Mac). I did find one for download, although I can’t seem to find it again. I’m afraid on this one, you’ll just need to check around with Google. Once you find one, you need to name it “vMac.ROM” and place it in the same directory as the Mini vMac application.
The disk image format used by Mini vMac isn’t one that can be created with Disk Utility. However, the developer has made available an archive of blank disk images that you can use in sizes ranging from 400 KB to 24 MB. Just like the ROM image, the disk image should be placed in the same folder as the application.
Like System 7.5.3, Apple offers 6.0.8 as a free download. Once you have the system software disk images (the two 1.4 MB images should work fine, but you can also use the 800 KB sized images), a duplicated blank disk image, and have placed all three in the Mini vMac folder, you can launch Mini vMac. It will automatically mount any images it finds in the same folder it is in. The duplicated blank image should be named “disk1.dsk.” The installation disks can be mounted by dragging them to the Mini vMac window after you’ve launched the program.

Conclusion
Know that there are many options and roads that you could take to get classic software on your Intel Mac. What I’ve covered here is simply the path that I took. I find emulation very interesting and perhaps down the road I’ll look into emulating an Apple ][ and an Atari 800 (the two other early computers I used). There are hundreds of educational programs and games available for these older platforms, and many of them are available for free, having been released by the owners. If nothing else, using such emulation brings back a nice feeling of nostalgia.
Also in This Series
- Give Alert Sounds a Little Personality · March 2012
- Create Your Own iPhone Ringtones · February 2012
- Create Your Own Homemade Audio Book · December 2011
- Upgrade to Lion Painlessly · August 2011
- Make the Most of TextEdit · July 2011
- Using the Free Disk Utility on Your Mac · May 2011
- Making Use of QuickTime X · March 2011
- Making the Most of What’s Already on Your Mac · February 2011
- Making the Most of What’s Already on Your Mac · January 2011
- Complete Archive
Reader Comments (91)
Perhaps it's because these OSes are less complex than Windows XP, but none of these emulations were lagging in speed. Whenever I used to run WinXP under Virtual PC on my PowerBook G4, it was always too slow to do anything but a quick check of software I wrote. With these, the responsiveness was always good.
I did have a few crashes, but I honestly don't remember which they occurred in. It was either SheepShaver or Basillisk II, but Mini vMac may not run the software you need.
My recommendation would be to try SheepShaver first. These don't take too long to set up, so it's cheap to try them out and test to see if the performance and stability are satisfactory for you.
I think that Apple considers the modern fulfillment of HyperCard to be found in AppleScript Studio, but I agree that it's a shame that the product has been abandoned. HyperCard was much easier to use than AppleScript Studio.
Wayne,
If you're asking about the running of Apple ][ software on modern Intel Macs, a Google search of "apple ii emulation" led me to KEGS-OSX. It doesn't appear to be universal, but perhaps it would allow you to run Apple ][ software.
For the most part, I use Basilisk II, mainly because SheepShaver seems buggy with a 7200 ROM. However, Basilisk II is slow on my PM G3 beige, so I shouldn't really talk.
Well, the last version wasn't. Despite being in colour, it was incredible SLOW. Emphasis on SLOW. Despite having the latest hardware (and years later I tried it out on a mac which was generations ahead of the Hypercard era... with the same results), it hardly ran any faster than the previous versions. Infact, I preferred the previous versions to the last one that shipped because they launched faster, ran faster, and generally... just fast.
Adobe/Macromedia Flash has now conquered what was once Hypercard's area, and has made animation/games/apps even simpler to code.
But I was wondering, since all three of these emulators also are available under Windows, if they would perform better or worse if you had instead installed the Windows versions under Parallels and/or Boot Camp? It would be an interesting experiment!
John
If I understand you correctly, you copied an existing system folder to a disk image and are atempting to boot from that.
If that's correct, then my first suggestion would be to install from a CD. Hopefully you have an 8.5 CD around that you could use. When I was setting everything up, I inserted my 8.5 CD into the drive and SheepShaver booted the virtual machine off of it.
If you don't have a CD that you can boot off of, then you might download the free System 7.5.3 that Apple offers on their web site, which will allegedly work with SheepShaver, though I haven't tried it myself.
Chuck
Thanks, but the article says "Although on some platforms SheepShaver can run any OS from 7.5.2 through 9.0.4, under Mac OS X, the earliest supported OS is 8.5."
I have a 7.6 CD and would be just as happy to use that version. Has anyone tried SheepShaver with 7.6?
John
If you have a 7.6 CD, then I suggest trying Basilisk II instead. I was successful getting 7.6 to run under it on my MacBook Pro.
Chuck
Hank The Cowdog
Anyone have any suggestions?
SheepShaver is not an option to use under Mac OSx86. I try in my MacBook Pro 2.16 ghz and is unstable, can't communicate both worlds (classic and mac OS X) because the unix hard drive destroy the resource fork of the files and can't transfer it in an easy way. AppleShare doesn't works also. The only solution is to wait a better version of SheepShaver. :((((((
Can't have a solution for backward use of classic under mac OSX86 and this is a great disadvantage.
I followed the SheepShaver instructions to the letter, except that I used a disk image that I downloaded somewhere, which is definitely a legitimate cd of Mac OS 9.
I used the Basilisk keycodes file and the Mac OS ROM from the link in this article. When I start SheepShaver, I get the floppy disk icon with the blinking question mark. This is on a MacBook. What have I done wrong?
The ROM file may not be right, I'm not sure - I might have the wrong one - I need one, in any case, that's for Mac OS 9.
Nothing happens. Frustrating to get thsi far and be stumped. I also read that I will need at least OS 8.6 or similar.
Help would be appreciated, thanks. :)
Comparing speed by a spellcheck of a 48,000 word WordPerfect document with footnotes, my 1.25 Ghz PPC G4 iMac took 16 seconds, and SS on a 2 Ghz MacBook Pro with an Intel core duo chip took 20 seconds.
I will post more (as I learn more) at http://tech.groups.yahoo.com/group/wordperfectmac.
Thanks to everyone for this article and discussion!
Copied a working OS 9.0.4 System folder from another Mac, but SS gave me a blinking "?"
So here's what worked: With the 9.0.4 folder on the virtual disk, boot from the CD. Using the CD's OS, bless the 9.0.4 folder (open the folder, double-click the system file. When it opens, close it, then close the folder, which should now have the smiling faces on it). Use the CD OS's "Startup Disk" CP to select the 9.0.4 folder. Reboot.
Hey, Presto!
When I run TomeViewer and choose the ROM Update and Archive>Expand, I get an error "There was a problem decrompressing the file "Mac OS ROM". (-43)"
Please help
Pam
Well two months ago, my imac g3 400 died....(sad day)_
Now, in order to reinstall everything, i need classic somehwere......
It sounds to me like I need classic to extract certain tome files and what not....but ultimately I am going to need the os9 discs to make it all work.
Well I have those...
It seems like you make the 'other' pre-install disc files available for download without breaking copyrights, as they would indeed prove useless to the person that doesn't have discs to begin with??
Right now, I am trying to get all this up and running on my new imac-intelmac...
Sheepsaver won't run...the tomeviewer won't run...it all downloads and appears to install...but the icons just dont work or do anything....
I am stuck. I woudl love a downloadable version of a disc image that would then allow me to pop in the discs I do have and boot up.
None of my computers will boot from any of the os9 discs I have...holding the c button does nothing....
i have 5 restore discs here, and I know two of them were os9.02 or earlier....but sheepsaver keeps telling me that it is not compatible with this configuration...
I get all the way to the end and then cannot install the os from the cd.....
It is maddening....
I know this because inside of the sheepsaver os9 boot up, I selected system profiler...it says clear as day 9.0...
but it never lets me click the restore button...
nor the install button...
Going crazy~!!!!!!
1) Get your brother to make a drag copy of his system folder onto a CD and send it to you.
2) Drag that copy onto your "OS 9 disk".
3) Boot sheepshaver and let it load an OS from the Install CD (the one you can't install from).
4) Using the OS 9 that loaded from the Install CD, tweak the OS 9 system folder you dragged there to bless it (open the system folder, open the system file, close file, close folder; folder should have smiley faces).
5) Use the Startup Disk CP to select your newly blessed OS to boot from.
6) Reboot.
I thought I would need 9.04??
Can I just drag my system folder from the install discs..????
and then whenever I double click the startup disk control panel icon...sheepsaver crashes...and blips off...no error message....happened four times in a row....
I believe the OS on the CD is "special" in order to boot from a read-only device. I'm not surprised that it won't boot after you dragged it.
You can get some version of OS 7 from the Apple site; why not try that, while you look for a way to get a newer version. Once you get any version of the OS running, you might be able to install "Wish I Were" (not sure of the name) or one of the other hacks that make your Mac appear to be a different model than it really is. At that point you might be able to trick your install CD into thinking it's on the proper kind of Mac.
At that point, SheepShaver won't quit and I need to do a Force Quit.
Any help would be appreciated.
I tried SheepShaver on my PowerBook Ti and on my iMac G4 Flat panel. Behavior is the same on the 2 macs.
Thanks,
Chuck
Very, very helpful piece of software! I'm not holding my breath, but Apple really ought to revive old OS support on Intel Macs. Gotta be at least as many people wanting to run Classic on Intel as there are who want to run Windows!
Thanks for the original article!
What would be the latest version of hypercard to run in an old Mac SE FDHD running System 6 ? Is there possible to program/create apps using hypertalk using system 6??
-- I found a posting on the Emaculation forums (http://www.emaculation.com/forum/viewtopic.php?p=22957) that said not to use the Disk Utility to create the Mac drive image -- instead use the Create option in the SheepShaver GUI app. This fixed the problem of not being able to boot off of the hard drive after installing the System Software. I installed 8.5. During installation I was prompted to initialize the "drive", and all was okay.
-- Also, per the same thread, don't use the Startup Disk control panel to set the startup disk. I found that it wasn;t necessary after using a drive image created by SheepShaver.
-- For transferring files from the Mac OS X (I'm running 10.4.8 on an Intel Macbook), I created a second disk image, this time using the Disk Utility, and per the instructions above: I have the second, Disk Utility created partition in the SS list (AFTER the Sheepshaver created image!). I shut down the SS emulator; mount the Disk Utility disk image, and copy files from my old G4 to that mounted image in OS X. The I unmount the image, and start up the emulator. Both the SS-created image and the Disk Util created image appear on the Mac classic desktop, and I can copy files btwn the images.
-Owl
Whatever that means, I am totally not technical, but can program HyperCard like a breeze.
I also have an old iBook running 9.0
So, can I get this working???
I'm totally lost in reading through all this. Can someone walk me through this like I'm a 6 year old?
Thanks,
John
Are there any shops in the Philadelphia area that will do this?
Notes on Problems with Setup. (New 20" iMac 10.4.10 pre-installed using ROM from ROM Update 1.0)
1. I was unable to create a disk image from OS X Disk Utility that would work with SheepShaver. Got a -8812 or -8816 error in OS 9.0 install CD. If i tried to create an Image in Disk Copy OS9 from CD I could only make a 200MB image. Any larger would also give an Error.
Solution: Used SheepShaverGUI built-in Create which so far appears fine. Made a 595MB image file that the CD could install on to. (This file is not readable in OS X in anyway I have figured out, yet. It is a Disk image of some kind I think but OS X can not mount it.)
I have since installed all updates I felt I needed (i.e. Carbon-Lib 1.5, QT6, AS-client 3.8.8, etc.) making a very clean install of 9.0.4.
Problems I need Help with:
1. Networking is Dead, I have setup SSGUI with "slirp" but it appears to not be working as it should. I get nothing and if I do anything to goto the network OS 9 SS will lock -up.
2. Copying of any Files to the UNIX Dir. which I have at /Users/Shared/MacOS/ results in file that are unusable by any Apps or the System. The .smi update files I DL from Apple or even a simple Quark doc Copied from my server shows with a blank icon and can not be read. The only Workaround I had was to use that 200MB image I made in Disk Copy OS9. It can be mounted on Both sides in SS OS9 and in OSX. I Copy all files I need to move to it in OS X unmount and mount in OS 9. Files appear to have NO Type/Creator code look but even a .qxd on the Quark file and no go. I can't even get it to work if I copy .qxd file to startup Volume from UNIX Dir..
I would like a better solution and I'll post it if I find one.
Thats about it for now. The Networking thing is Key since if I could Mount my OS X Server Shares I would have no issues really.
BTW I have checked the Permissions on all file and Dir. in use by SS and 90% sure thats not the issue.
mail: qchrontech AT qchron DOT com
- Bootable disks
For me, SheepShaver cannot boot from a disk formatted as "Extended", it needs to be the old (pre OS 8.5?) "Standard" format. Hence the need for Creating the startup disk with SS GUI I guess, formatting it as Standard at the OS 9 prompt.
- Unix folder
The "Unix" shared folder seemed to work just fine at first. However, as it turned out, transferring files that way made some characters get substituted and some files were not found by OS 9.0.4.
I created several disk images with OS X Disk Utility, as the Extended format works fine for Classic to use other than booting from. Then Add the images under SheepShaver GUI. This way, OS 9 has the SS boot disk, the Unix disk/folder aswell as a couple of disks usable by both OS 9 and X.
- Crashing
SheepShaver and OS 9 crashed severly on me at one point, leaving the OS X images unreadable by OS 9. I made new images under X, transferred the files, and set SS GUI to the new ones. Fixed.
I also chose a higher refresh rate to get OS 9 to run faster, which seems to work great!
Again, thank you.
I followed the instructions above step-by-step.
However, when I insert the OS 8.5 software install disc and click on the installer I get this message:
"This Program cannot run on your computer. See the documentation for more information."
Does anyone know why this would happen ?
Most likly the 8.5 disk you have was provided to you with the purchase of a new Mac. Mac OS install disks are sometimes encoded to work on ONLY the series of Macs it ships with. The installer will not let you install the OS on an iMac lets say if the OS disk shipped with a Blue and White G3.
You need a clean store bought full install of the OS or a disk installer that does not have that limitation.
Michael Ojaste - file transfer from/to SheepShaver is described very instructively in this document:
http://www.svpproductions.com/os9onxintelmac.html
For changes in the transfer folder to be seen, it must be updated. This is done in SS by restarting the PPC system, in MacOS X by unmounting and remounting the disk image holding the transfer folder. Good luck.
I cancelled the installation and the CD window opened with Uniex up and no other drive.
So far, whenever I set 24-bit addressing in the Memory Control Panel - close it and re-open it - the setting has not "stuck." Restarting the emulator from the point of just clicking 24-bit addressing does not work either.
I am running Basillisk II on a PowerBook 12 (G4) using a Quadra ROM and System 7.5.5.
i dont have any old OS discs or anything like that, the sheepsaver i downloaded came with OS 9 and 3 blank HD's 400meg 800meg and 1.2meg.
i am very new to mac, just got my laptop in january, but im trying to make these games work i copied them into the users/shared folder so i can pick them up in sheepsaver, they are .dmg files, does this make a difference, when they are activated i get an error:
the document could not be opened b/c the app program that created it could not be found.
could not find translation extension with appropriate translators.
what does this mean? and how do i fix this?
Also, i am having a hard time finding the sheepsaver settings menu you've got on the site, its not in the drop down menu on my osx background so i dont knwo where else it would be. im sure this is a stupid question, but i dont know any mac users to lend a hand..
Thanks for any help you can provide
-Julia
I found your article of vital importance to me since I still have some old medical programs only running under Mac 0S 9. However, I also found it a little complicated, especially finding out and manipulating the files needed for SheepShaver to work. Would it be possible to get them from you, let's say, as a disk image? Thank you for your help.
Kind regards
CS
Thank for all answer
Ludo
What version of MacOS 9 are you trying to use? The most modern version Sheepshaver can use is MacOS 9.0.4. Don't try to use an install disk for a later version.
I have thousands of Resolve spreadsheets I'd like to be able to open in iMac Intel, just to read, if required.
Help to do this would be appreciated please.
Vaughan@GrazingInfo.com
My problem is the other way! Can I run an intel only app - or one that says 'an intel processor' in its minimum system requirements on a powerpc based mac?
Peter
Additionally I would like my Classic to run OS 9, but I have still not managed my computer to accept this fact.
http://rapidshare.com/files/126637552/COI__Classic-On-Intel____SheepShaver.zip
(No effort is involved - just download it, open it, and have fun!)
I had to change to QT 6 to get starship titanic to work, though.
Now it's ok though!
1) identify someone near you who can understand the article above (which, technically, directly answers your question) and set it up for you, or...
2) go on eBay or Craig's List and buy an older Power PC Mac that you can use temporarily and possibly network to your new machine to copy over your items.
I should point out that it's probably not your documents that have the problem. It's Classic *applications* that can't run on the Intel, not the documents. Sounds like you're trying to run old Classic apps. Another solution may just be to get the newer versions of whatever applications you're trying to use that can run on Intel machines and use those to open/upgrade your documents.
There are things in system 9 that I still miss. It was so easy to write macros in AppleWorks 5. I'd gladly pay someone $100US for a cd that I could use to install my OS 9.2.2 on a Mac Intel.
I open most all my old AppleWorks in iWorks 09. My PageMaker files in Creative Suite.
MacLink Deluxe helps too.
The old computer is on my desk now I have to find the cords and hook it up, if I can.
It was originally, but enterprising souls have written installers and such that make it easy. See http://tech.groups.yahoo.com/group/wordperfectmac/, in Links > SheepShaver and Basilisk.
I could never get the iBook to start up and wondered if anyone knows where I could get it fixed without having to take out a 30 year mortgage to pay for it. That would give us a spare laptop and who knows, it might help me open some of my "Classic Bound" files. Anyone?
Word processing documents can be opened in most text editors; some of them will even honor the document's formatting, but even the ones that don't will give you access to the text portion of the document.
Emails, also, are usually just text documents, although some email clients (Eudora comes to mind) store all your messages sequentially in one large file.
Photos are almost undoubtedly JPGs (or possibly TIFFs), and can be opened in many OS X apps.
For all of them, though, double-clicking on the file *may not work*. Instead, try dragging the document onto an OS X app's icon, or opening the file using the "Open" dialog from within the OS X app.
True, there are older (and current) apps that use proprietary formats, but most of the time the problem can be solved by telling a specific app to open the file rather than telling the file to find an app for itself.
Try "TextEdit" for anything that probably contains text, and "Preview" for anything that's probably an image.
I am particularly partial to "TextWrangler" a wonderful text editor which is free and worth a whole lot more than that. One of the reasons I like it is that it will open *anything* you drop on it. It will even display JPGs.
Once you've got your files open in any OS X app, you can edit them (or not) and save them out, being sure to use the "Save as..." dialog, which will "attach" the new version of the file to the OS X app you used to open it. Also be sure to save the new file on your OS X Mac's disk so you can get to it easily in the future.
Good luck
Isaac
I moved the file to Applications, Highlighted It, went to Finder/services/Text Edit/Open Selected File and suddenly up popped the untouchable file. I was able to do this to 4-5 files and print them. Thanks for your help.
Glad to be of help. Try the same thing using "Preview" to open those image files.
Isaac
I'd like to run an old OS system based application to run on my Intel based Mac Pro (Dual Core Intel Xeon).
I found your page here being very useful, the best I found around in order to get a help to emulate the Classic environment on a new Mac.
I followed everything you mentioned on your page, I have now all (apart from the system!) the needed components (the ROM I have now finally works) & I manage to see SheepShaver starting up (only) correctly. It points out at the directory where the dmg volume that 'should' contain the system, but at this point the question mark comes up (it cannot find a system). This is where I get stuck. Basically, I have created the volume but I don't have inside a system that works. I haven't installed a system inside this volume using an installer as these would be the old installers (working on an old mac system) that don't open on the new Intel Mac. To go around this, from another webpage I instead used a starter disk already prepared and downloaded from the net called starterdisk (see: from this website:
http://www.macosxhints.com/article.php?story=20060509180914879&lsrc=osxh
at point 1: "E-Maculation has a downloadable OS 7.5.3 starter disk already prepared").
When I point Sheepshaver starting from this volume, as the Classic env. attempts to start up it says: "This startup disk will not work on this model. Use the latest Installer to update this disk for this model. [Restart]).
As this ended up not working, I tried then copying the content of the same starterdisk file to another dmg mounted volume that I created with Disk Utility.
As I re-point Sheepshaver to start from this other volume (the dmg I created that now contains the same files than those inside the starterdisk file), the question mark at start up comes up again :/
Do you have a suggestion on how to create a volume that contains a valid system for Classic to correctly boot up, just using the Intel computer I use?
Thank you in advance
Kind regards
Antonella B.
If you're still playing around with sheepshaver, can you tell me if Classic On Intel works on later versions of MacOS... and how late? What are we up to now? OSX v11.something?
What's the most modern mac that you know of, on which I can use "Classic on Intel" via sheepshaver?
Many thanks for any tips!
Add A Comment