My Apple Wedge
FileMaker Pro Templates Overview and Tutorial
My contribution this month is an overview of the template databases that come with FileMaker Pro, together with a little tutorial on how to customize one of the templates.
FileMaker Pro
According to its official documentation, FileMaker Pro is:
…the workgroup information management tool which allows you to quickly create solutions adapted to your business needs. With powerful features, broad platform support, and an easy to use interface, FileMaker Pro 5.5 is a must have application for anyone who needs to track and manage people, projects, and information.
In other words, it’s a powerful database program that the average user can use. Of course, you can use it for more than just your business needs. In particular, you can design your own customized solution and deploy it across your home or company network. FileMaker is the premier small to medium sized database program for Macintosh and Windows. What distinguishes it from other database solutions, especially larger scale ones, is that with FileMaker you’re up and running in a flash. It allows you to easily integrate a graphical user interface on top of a relational database system.
For this review I used version 4, which was published almost two years ago. The reason I used this version 4 over version 5.5 is because many still use it, because it gets the job done, and because it has the most templates to explore.
Those interested can read ATPM’s review of FileMaker Pro version 3, written some five years ago. Much has changed since then in terms of FileMaker, computing and Apple, but FileMaker is still an excellent program. Its user base is in the tens of millions and will be for a while thanks to its Internet integration, QuickTime capability, backwards compatibility, and much more.
Databasics
When I was thinking about the topic for this column I wanted to do something about FileMaker, and since I’m not a FileMaker wizard nor do I have the latest version of it I decided to write about what I see as a hidden treasure of the FileMaker Pro package: its templates. These are database stencils of sorts that you can customize to fit your specific needs. I believe a lot of users gloss over these when they first start using FileMaker because a) they own FileMaker to run a particular database solution someone else made or b) they want to build their own database solution.
When I first encountered FileMaker I fell into the latter category. Our school’s triathlon team was putting on a race and as one of the organizers and resident computer geek I volunteered to take care of the race registration and the computer solution this would require. I scoured the school’s software licenses and found FileMaker. After months of teaching myself FileMaker I finished a complete database solution for race directors, covering aspects from volunteer management and PR activities to race timing. Over time I came to find out how powerful FileMaker is and that my solution merely scratched the surface of its capabilities.
I wish I had had the time to become familiar with FileMaker from the ground up when I first worked with it but, as we all know, necessity is the mother of invention. And getting to know it from the ground up is what its templates are for. So, let’s have a look at them.
Templates Schmemplates
Before we start customizing let me run by you the impressive list of templates that FileMaker Pro 4 includes. They are divided into three sections: business, education, and home.
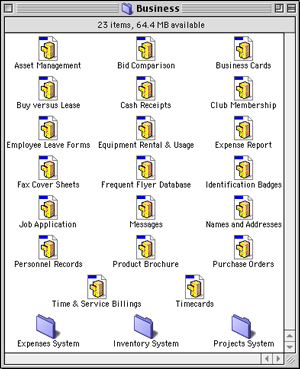
FileMaker Business Templates
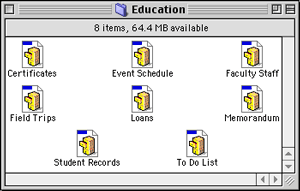
FileMaker Education Templates
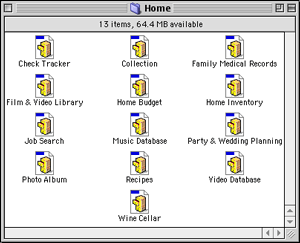
FileMaker Home Templates
FileMaker Pro 5.5, on the other hand only comes with sixteen templates.
As you can see, the templates cover a wide range of uses, an indication that, whatever your database needs are, FileMaker can probably help you accomplish your task. Use these templates as your diamond in the rough. Take them as a starting point to develop your full-fledged database solution. In fact, let’s open our treasure trove and try that with one of the templates.
Customize, Personalize
For our template, we’ll choose Home Inventory in the Home folder of the Templates folder. If you’ve ever wanted to take inventory of your possessions for insurance purposes and such, then here is your chance. Make a copy of the template file in the Finder, move it to your favorite destination, and rename it to My Home Inventory. In addition to the template in the FileMaker Templates folder we will be using FileMaker’s Buttons and Dialogs database in the FileMaker Examples folder to customize our solution.
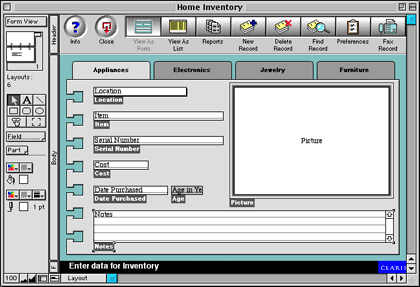
Home Inventory
Open My Home Inventory by double-clicking on it. Our first step is to switch FileMaker’s mode from Browsing to Layout. Browsing allows actual use of a database and data entry, and Layout mode allows customization. Switch between them using either Layout in the Mode menu or by choosing Layout in the pop-up menu at the bottom row of the template window. Be aware that everything you do to the items in the layout will take effect right after you make the change.
Buttons? We Don’t Need Any Stinking Buttons. Wait, We Do!
First we’ll add a couple of buttons to the layouts of our My Home Inventory. In Layout mode, click on the text below the first empty graphic and change the text to Preferences. Click on the text below the second empty graphic and change the text to Fax. Click on the two empty graphics while pressing the Shift key to select both of them, and hit the Delete key to delete them.
Open the Buttons and Dialogs database, click on Template Buttons, and switch to Layout mode. Click on the Preferences (the one with the checkmarks on the clipboard) and the Fax (the one with the fax machine) button while pressing the shift key to select both of them. Hit Command-C or choose Copy from the Edit menu, switch to My Home Inventory, and paste them onto the layout. As with any object on the layout you can move the two new graphics using your arrow keys until they are positioned correctly.
Where There’s A Will, There’s A Script
Next, we’ll have those new graphics do something for us. To have the Fax button fax a record you need to have a fax modem attached to your computer and the fax software installed. Now we need to write a script and attach it to the button. FileMaker uses its own scripting language and built-in scripting environment. For now, follow my directions; I’ll explain later.
Select ScriptmakerTM from the Script menu, enter Fax as the script name, and hit Return. We’ll keep this rather simple and write a short script using the built-in script steps. In the script definition window, double-click on the Show Message script step from the Miscellaneous category. Click the Specify button and enter “Make sure your fax hardware is turned on and the fax software selected in the Chooser.” Double-click the If script step from the Control category to make it your next script step. Click Specify and select Status Functions from the View pop-up menu. Double-click Status(CurrentMessageChoice), write “= 1” into the text box and hit Return.
Next, double-click the Print script step from the Sort/Find/Print category. This little script will do the following: upon clicking the Fax button on your layout a message dialog will appear reminding you to turn on the fax software. If you choose OK, FileMaker sets the status of the current message choice to “1” (the first dialog button), and the Print command is executed which should be the Fax command, if your fax software is working correctly. If you hit Cancel, FileMaker sets the status of the current message choice to “2" (the second button), and the Print command is not executed. You have just written your first script!
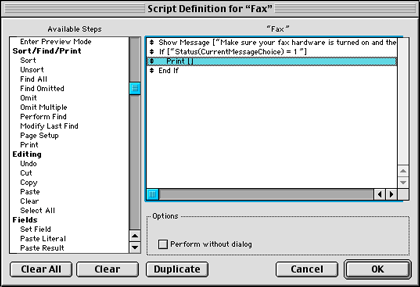
My First Script
Now, let’s attach the script to the graphic. Select the graphic by clicking on it, select Button… from the Format menu, click on Perform Script from the Control category, and select your Fax script from the Specify pop-up menu. Hit Return and you’ve just made your first scripted button.
Before we finish with this layout we’ll perform a couple more customizations. First, let’s change the background color of our layout. In Layout mode, click on the vertical gray bar labelled Body. Clicking on the small color palette button above the little paint bucket will call up the background color palette. Move the mouse over the lightest yellow and click once.
Clicking on the small hatched button above the little foreground/background icon will call up the pattern palette. Move the mouse over the lightly dotted pattern and click once. You won’t notice a change yet because there is an image layered above the background. Click once on the turqoise background of the layout to select the image and hit the Delete key to delete it. You should notice how the background changed to a light yellow.
Homework
The last part of our customization will be part tutorial, part homework. Instead of inventory items that belong in certain inventory categories we will implement buttons with a few categories to switch to instantly. We’ll write a couple of scripts again and attach them to a few buttons.
In the first step, we’ll duplicate our layout to accommodate the different inventory categories. Select Duplicate Layout from the Mode menu to create a layout per alternate category. Now we can delete the Category field and its corresponding label. Next, we need to adjust the gray sheet graphic just above the background to make room for some tab graphics. In Layout mode, select and cut the sheet graphic, and paste it into your favorite graphics program to shorten the top portion so the tabs we’re about to add to the top of the sheet will fit onto the layout without having to enlarge it.
Next, we’ll copy a tab graphic from the Family Medical Records template from the Home templates folder. In layout mode, paste it onto our new layout, and change the text in it to a new inventory category by double-clicking on it and writing over the old text. Following this, write a script that changes to the new layout by using the Go To Layout step from the Navigation category. Repeat these steps for every category you want to create.
Lastly, we need to add a Find script step to the scripts that switch to the different category layouts so that only those items in a particular category are shown. Also, we need to add a script step to the New Record button where we set the category of the item to the category of the current layout using the script step Status(CurrentLayoutName). Check the picture below for what the final template should look like when you’re done. You’ve got your homework, let me know how you’re doing. Your layout should look something like the picture below and function as described.

My Home Inventory
As you may have seen in our little example, it is relatively easy to customize a database template, but it can become tricky to keep track of buttons, scripts, layouts and more. This is why it is important to keep an algorithm of the script steps and an overview of the relation between the layouts current.
The Weakest LinkTM
I have used FileMaker for over three and a half years now and haven’t realized the half of what’s possible to implement in FileMaker. Proof of this comes in the plethora of versatile database solutions that can be found as freeware, shareware, or commercial packages all over the Internet. If you think FileMaker is the weakest link, think again—it may be you! Solicit the advice of a FileMaker Solutions Provider and let them help you solve your problem.
• • •
As for this column, let me close by asking you to send me suggestions for future FileMaker columns. If you would like a FileMaker problem solved or you need some advice on explaining the basics, advanced tricks, or FileMaker scripting, let me know and I will definitely consider it. Thanks in advance!
On a final note: after visiting a local Apple Authorized Service Provider and trying out the new iBook, I really wish I could cough up the cash for that machine soon. I recommend everyone try one out at their local Apple store; it sure is a sweet package!
Also in This Series
- Interview With a New User · December 2001
- Visitors at the Apple Retail Store · November 2001
- Housekeeping · October 2001
- Organized Mobility—Mobile Connectivity—Connected Organizer · September 2001
- …Hoelle des Nordens von Roubaix, Tour de France, Tour de France… · August 2001
- With the Stroke of a Pen · July 2001
- FileMaker Pro Templates Overview and Tutorial · June 2001
- Complete Archive
Reader Comments (6)
Thanks,
Alan Fries
Add A Comment